LED Wall
For London Decompression 2015 I made a wall of LEDs react to music. The piece has 960 LEDs in total. This was my first ever electronics project, aside from having done about 5 of the example circuits that came with my Arduino starter pack.
Note from 2020 Amy :
This article was written in Jan 2016 when I was just getting into this stuff.
If you are looking for a guide on how to get started with Fadecandy and LEDs, then I recommend checking out my Instructable written in 2019.
This article is here more for posterity than guidance. :)
Hardware
The strips I used are made up of RGB addressable LEDS. There are 30 LEDs/meter and I bought strips covered in IP67 rubber coating to protect them.
Close up, the strips look like this. You can cut them anywhere along those white dotted lines. I cut my strips into 2 metre sections, giving 60 LEDs on each strip.

The little gold or tabs in between each LED allow you to solder up connections to the strips. (The silver tabs on the left are just solder sitting on top of the gold tabs).
There are two main components to wiring up a project like this, Data and Power!
Power
The LED strips pull 5 volts and each strip needs about 3.6 amps to run at full power. Across 16 strips, that’s 57.6A. That’s quite a lot – I needed 288W to run the strips at full power. I used a power supply from inside a desktop computer which can provide a max continuous wattage of 250W. In reality, the wall doesn’t seem to be able to get beyond about 75% power, I think this is most likely due to voltage drop and could probably be fixed by using higher gauge wires. This is fine because I don’t need to run all the LEDs at full power at once – that would be blinding!
I cut the cables which connected the desktop’s CD drive to it’s power supply, and then soldered up distributors and wires to split the power 16 ways. At the LED strips, I soldered up cables to the 5V and ground tabs. I used plug and socket connectors so that each strip could be easily removed and moved. I also used a plug and socket connector at the desktop end which means it is really easy to unplug the power but I actually think this is the main reason for the voltage drop as the connectors are low gauge and they are throttling the power to the whole wall.
Data
Data will only flow in one direction through the strips, and it’s clearly marked by the white arrows you can see in that photo above. On each strip I soldered up another ground cable and a data cable.
Data is driven to the strips using FadeCandy boards from Adafruit. Each FadeCandy can run 8 strips of up to 64 LEDs. So for this project I needed two FadeCandys.
I soldered double header pins to the Fadecandy boards. I did not do a very tidy job – but it works!

Note from 2020 Amy:
omg my soldering has improved so much since this. I considered not including this image because I didn’t want anyone to think this is the level of my work now but, actually, sharing the process always wins out.
FadeCandy
There is a really good guide to setting up the FadeCandy software here. The only bit I struggled with slightly was editing the config file to allow for two FadeCandys but I ended up working it out. This is what my config.json file looks like:
{
    "listen": ["127.0.0.1", 7890],
    "verbose": true,
    "color": {
        "gamma": 2.5,
        "whitepoint": [1.0, 1.0, 1.0]
    },
   "devices": [
        {
            "type": "fadecandy",
			"serial": "FIRST SERIAL NUMBER HERE",
            "map": [
                [ 0, 0, 0, 512 ]
            ]
        },
        {
            "type": "fadecandy",
			"serial": "SECOND SERIAL NUMBER HERE",
            "map": [
                [ 0, 512, 0, 512 ]
            ]
        }
    ]
}
I then use a command prompt window to run the fcserver program with config.json:

Once that’s running, you can go to http://localhost:7890/ and you’ll see something like this
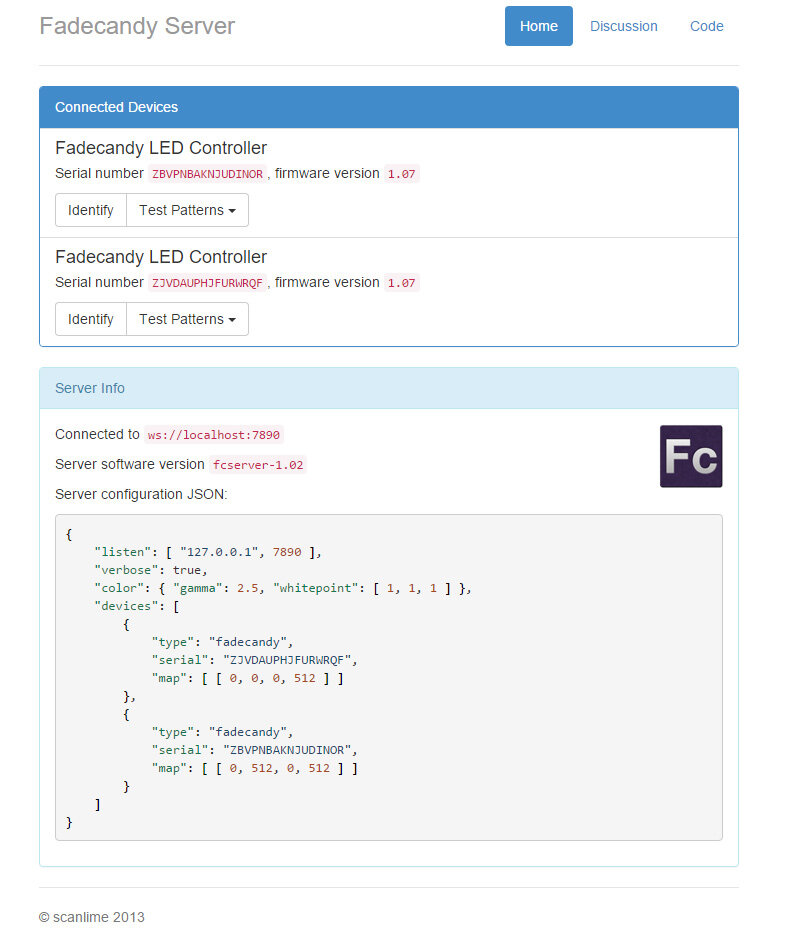
From here, you can use those drop downs at the top to test the LEDs! Here’s what testing the LEDs at 50% brightness looks like.

If I set it to 100% brightness, everything goes orange because there isnt enough power but, as you can see here, 50% brightness is plenty bright enough!
Problems
It is so rewarding to see all these turn on because I did have some problems along the way!
I had hoped to use the same desktop for power and running the software but this didn’t work out. I still have no idea what the problem was as everything was fine with 11 strips, then I soldered up the remaining 5, plugged it all back in and one of the FadeCandys wouldn’t connect.
This was at 4am, about 35hours before I was meant to start hanging the piece up for Decompression. I tried swapping out every element of the system to find the problem and the only thing I could find is that one of the FadeCandy boards is just refusing to talk to the desktop. It worked fine with my laptop though, so I ended up using that.
Software
I used Processing, a programming language for drawing, to control the colour of the LEDs.
In Processing, I set up a canvas of 1950 x 800 pixels, then I used a library called OPC to map the LEDs across the canvas. Then, when I draw shapes of various colours into the canvas, the LEDs react accordingly.
To make the LEDs react to music, I used a library called minim, which takes inputs from sound such as amplitude, and then I used those numbers as coordinates for the shapes. I still don’t think I’ve completely cracked the idea of this, but I’m happy to share my Processing sketches if anyone is interested.
Decompression
Setting up at Decompression was really stressful, I was operating on about 3 hours sleep/night for the past few nights! I took a week off work to work on this project but I really wish I could have had a couple more days!
It came together in the end though, although the power desktop did keep powering off through the night which was frustrating. Definitely rave-proofing is a key improvement that needs to happen, as I suspect something was getting knocked that was turning it off, or perhaps things were overheating.
It was super exciting to see it up on the wall though and having people enjoy the lights. It had a really good reaction and I got a lot of compliments on it!